Hobby DIY: Add LED Lighting to Your Airbrush Spray Booth

 Hobby Tradecraft, News and Info, Tabletop Gaming  Comments Off on Hobby DIY: Add LED Lighting to Your Airbrush Spray Booth
Jun 232016
 

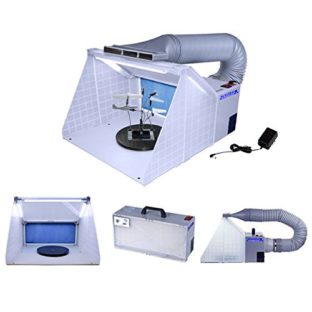
In a previous post about airbrush accessories, one of the items I recommended for someone getting into airbrushing miniatures and models is the addition of an airbrush spray booth to control paint odor and overspray. You can build a spray booth yourself or go the ready made route with one of these handy portable airbrush spray booths you can find on Amazon. These airbrush spray booths are convenient and well suited to a small work space. The portability is also handy if you’re not able to keep it set up all the time as it folds up to about the size of a small carry-around tool box.

One thing that bothers me about these spray booths is that, as an older gamer who’s eyesight is not what it used to be, I like lots of light when I’m painting. It can be a bit of juggling act to get light where I need it in the spray booth. I noticed awhile back that some of these booths now come with an internal light of some sort so I figure I must not be the only person who feels that way. After messing around with various swing arm lamps and stick on lights I finally decided to look for a better solution and I believe I’ve found one with LED strip lights.

Early on, I decided that I wanted this airbrush spray booth lighting mod to be as easy as possible, so that meant I didn’t want to have to take the entire spray booth apart or rewire or solder anything unless absolutely necessary. The goal was to do the mod and not have it require a person to learn a whole other set of skills including electrical engineering just to get some lights installed. What I’ve come up with meets that goal and provides a great lighting solution for those folks who already have one of these portable airbrush booths that didn’t come with pre-installed lighting.

The LED Airbrush Spray Booth LED Light Mod Parts List

Before we get started you’ll need to round up a few things. For the parts you need to buy, I’ve included Amazon links for convenience. You’ll need the following:

Your Airbrush Spray Booth

airbrush spray booth

The Master Airbrush Spray Booth

A 12 Volt Flexible LED Strip Lights Kit – I recommend you choose a set of lights that are in the 6000K Daylight range for painting. If you’re not sure what a “Daylight” bulb is, go ahead and check out this post I wrote awhile back on lighting so you’ll understand why I’m recommending that. This kit has a spool of LED lights on a flexible adhesive tape and some stuff like connectors, a power adapter and some optional items like a remote control, etc. You won’t use everything in the kit for this project and you’ll have LED tape left over for another project like under cabinet lighting or modding something else. (I used my extra LEDs for some under cabinet lighting and scored some points with Mrs. HCIL)
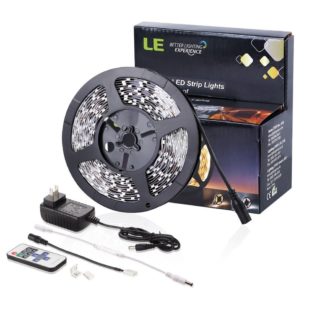
This LED light kit and a few other items is perfect for adding bright lights to your airbrush spray booth

This LED light kit and a few other items is perfect for adding bright lights to your airbrush spray booth

A four way DC jack splitter – I used a four way to get four strips of LEDs in my airbrush spray booth because I like lots of light where I’m working. You could go with a two or three way splitter, whatever you think will be adequate for your needs.
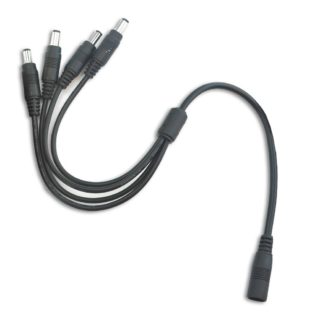
You'll need a splitter cable with enough leads to give you plenty of connections for all of your LED light strips. I used a four way splitter but these come in many varieties

You’ll need a splitter cable with enough leads to give you plenty of connections for all of your LED light strips. I used a four way splitter but these come in many varieties

Several two pin quick connector to DC female adapter cables – you’ll need several of these, one for each strip of lights you’re installing. The LED light kit includes one. I bought a 10 pack of these because I knew I was going to use the rest of my LED light strip eventually.
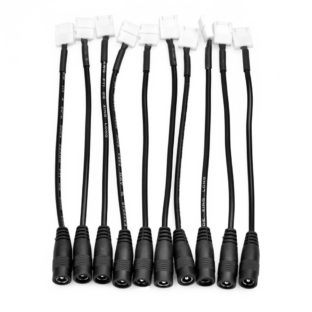
You'll need one of these quick connectors for each LED light strip. Buy some extras because you'll have a lot of LED tape left over after this project.

You’ll need one of these quick connectors for each LED light strip. Buy some extras because you’ll have a lot of LED tape left over after this project.

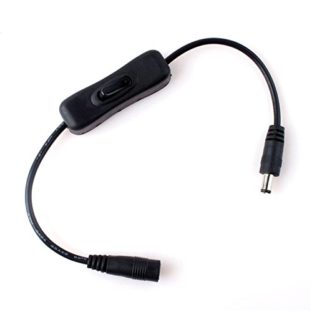
An on/off switch with DC male and female connectors – The LED kit comes with a wireless
RF receiver and a multi-function remote but I knew I wasn’t going to use this for the airbrush spray booth mod. I did use these parts for the under counter lighting. (The remote does all kinds of stuff like dimming and pulsing the lights etc., a bit of overkill unless you’re planning a disco spray booth).

A simple toggle switch for your LED powered airbrush spraybooth

A simple toggle switch for your LED powered airbrush spraybooth

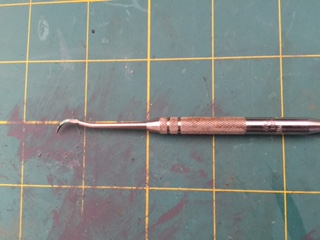
As far as tools go this was pretty simple. I used a tape measure, a pair of good scissors (the LED light tape has a metal backing so you’ll need a sharp pair of scissors to cut that), and something you can use to help line the LED light tape up in the connectors, I used a hook end sculpting tool. Lastly if you’re going to pass the wires through the wall of the spray booth you’ll need something to drill a hole about the size of a nickel for your pass-through. I used a flat wood boring bit because this was what I had handy, but you could use a Dremel or a hole saw if you have one.

The hook ended sculpting tool that I used to help line up the LED tape with the connectors

The hook ended sculpting tool that I used to help line up the LED tape with the connectors

Installing The LED Lights In Your Airbrush Spray Booth

This was pretty straightforward. First, wipe down the surface that you’re going to stick the LED light strips to. This needs to be clean and dry so that you get a good bond. Next measure to see how long the surface is that you’re going to stick the LEDs to. The LED tape has scissor marks on it that show you where it is safe to cut. As long as you cut it at the marked spots all of your lights will work, however if you cut the tape at an unmarked spot you’ll break the continuity and some of your lights won’t work. The LED tape safe cutting marks probably won’t be the exact length you want it to be but it will be pretty close and throw enough light to prevent any issues. Make your cuts cleanly and straight across the LED tape.
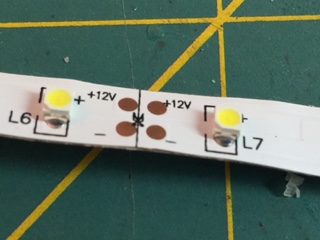
The cut marks on the LED light tape. Cut the tape in these marked spots to avoid any conductivity issues with your light strips.

The cut marks on the LED light tape. Cut the tape in these marked spots to avoid any conductivity issues with your light strips.

Next take one of your quick connectors and open it up. You’ll see that the tape actually slides under the plastic connector at the edges and then slides under the metal contact points. The exposed copper dots on the LED tape will be right under the contact points in the quick connector when the LED tape is properly inserted. Getting the tape under the metal contacts is a bit tricky as everything is a snug fit.
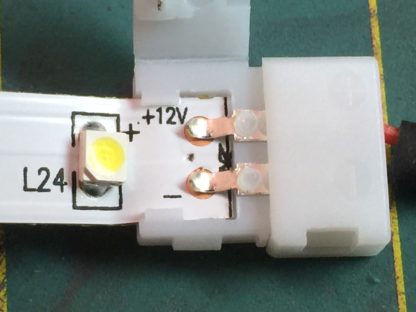
The LED tape inserted into the quick connector. Note how the connector has tabs to hold the LED tape in place straight. You want the tape to be all the way in so the metal contacts on the connector are resting on the contact dots on the tape.

The LED tape inserted into the quick connector. Note how the connector has tabs to hold the LED tape in place straight. You want the tape to be all the way in so the metal contacts on the connector are resting on the contact dots on the tape.

This was where I used the hook ended sculpting tool to gently grab the LED tape and pull it into position. You can also lift up the contact points a little bit but go easy and don’t go crazy with torquing them up. Once the tape is firmly in place, close the connector and make sure it’s snapped securely shut. You can see the locking tab in place on the side when it’s correctly closed.

Plug your newly made LED strip in and test it to make sure it works and all the lights come on. Test each strip after you’ve made it up. This is the time to test your LED lights and solve any problems, not after you’ve stuck the tape down to the spray booth. The LED tape sticks really well to a clean surface so you won’t want to have to peel it up once it’s in place.

Once you have the required number of strips made up, it’s time to stick them down. You can be very precise with this or just eyeball it. I’ll be honest, with four bright LED strips I just eyeballed it and wasn’t too fussy with it. I also waited until I had the tape stuck down before drilling my pass through hole for the wiring harness. Once I drilled the hole and arranged the wires I used some tape to stick them down and keep any stress off the connectors. For the purposes of this demonstration I used clear packing tape so you could see what I’ve done. I’ll be replacing this with gaffers tape. Once I had the tape in place I connected the on/off switch between the four way splitter and the wall adapter and was good to go. The lights function independently of the spray booth fan so I can have them off when I don’t need them in daylight.
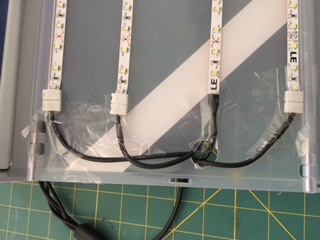
The LED light strips attached and the connectors taped down. You can also see the pass-through hole that I cut in the spray booth for the wires

The LED light strips attached and the connectors taped down. You can also see the pass-through hole that I cut in the spray booth for the wires

Airbrush Spray Booth LED Light Mod – Light On!

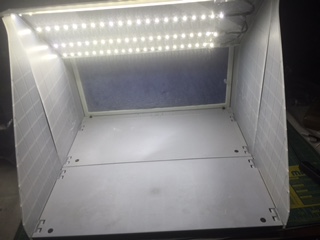
The fully lit airbrush spray booth with the LED light strips installed and powered on

The fully lit airbrush spray booth with the LED light strips installed and powered on

As you can see, this is actually a pretty easy mod and it does not require any knowledge of wiring or soldering. The result is that the interior of the airbrush spray booth is flooded with very bright, very clean light that’s great for painting. Additionally you’ll have some LED stuff left over that you can use on another spray booth (you could easily split this kit with a friend or three) or even on some models or scenery.

Have a comment or question about this post? Feel free to leave it below!

Thoughts on the Dwarven Forge Castles Kickstarter

 Board Games, News and Info, RPG, Tabletop Gaming  Comments Off on Thoughts on the Dwarven Forge Castles Kickstarter
Mar 272016
 

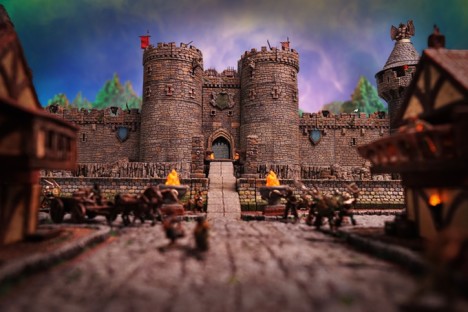
The Dwarven Forge Castle Builder System, What Is It?

The Dwarven Forge Castle Builder System Kickstarter

The Dwarven Forge Castle Builder System Kickstarter

As you may have heard, Dwarven Forge launched their long anticipated Castle Builder Kickstarter about three weeks ago. DF has been talking about this project and taking lots of community feedback for this system for at least a couple of years, possibly longer. What they’ve deployed for this Kickstarter is a truly massive and elaborate system that will eventually allow you to build some really impressive setups that’d be immersive and fun to play with whether you’re an avid fan of Dungeons & Dragons or any other fantasy RPG setting or a tabletop miniatures gamer.

The Dwarven Forge Castle Builder system includes a multitude of options allowing you to build the castle of your gaming dreams with square and round towers, large walls that can be made double thick for a castle that looks truly massive and options like gate houses, drawbridges and more. There are “mountain cliff” sets that will allow you to perch your castle on top of a rocky crag or make sheer cliffs a feature of the castle.

In the last 24 hours or so they’ve let the cat out of the bag about castle dressing packs that will allow you to theme your castle with runic/druidic decorations or take a darker turn with necromancer themed accessories. There are also powered up options that include lighted accessories and even a powered drawbridge that raises and lowers via a small battery powered motor.

There are still about three days remaining in the Kickstarter so Dwarven Forge is still in the process of releasing more add on packs that expand and enhance the Castle Builder system and as the funding total increases (it’s currently sitting at close to 1.2 million dollars in pledges) there will be the inevitable stretch goals.

Some of the rumored expansions include more dressing packs and architectural accessories, a moat pack, themed miniatures, and ruined wall and tower sections to show damaged or abandoned areas. The DF staff have mentioned that they sculpted as many as 140 different pieces for the Dwarven Forge Castle Builder system and if that is indeed the case there is much that has not yet been revealed to backers. There as been some talk that some items will not appear during the actual Kickstarter and may become available for purchase after the Kickstarter ends during the Pledge Manager phase. (The Pledge Manager phase usually takes place a few weeks after the close of the Kickstarter and gives fans a chance to add additional funds for more add-ons! or sometimes allows late backers who missed the original KS to participate).

The Dwarven Forge Castle Builder System, What I Like

The Dwarven Forge Castle Builder system is up to the usual excellent standards that you’ve come to expect from Stefan Pokorny and company. The castle builder seems well thought out in terms of modularity and there is a great variety of pieces that will allow you to build just about anything you can imagine. The sculpts themselves are beautiful and the pieces go together well. There is also a lot of compatibility with last years Dwarven Forge City Builder system which I bought quite a bit of and really like for tabletop gaming in particular. Dwarven Forge Kickstarter projects have all been made out of a super durable, almost indestructible material they like to call “Dwarvenite”. It’s something that you can allows your kids to play with and not need to worry about it breaking. In this Castle Builder Kickstarter they are using ABS for some of the large long pieces, this also promises to be extremely durable.

The Dwarven Forge Castle Builder Kickstarter has a variety of pledge levels, starting with a $20 “Add On Only” pledge that doesn’t include any of the castle set ups but does allow you to just purchase add on and accessory packs individually if you’d just like to add a few things to your other DF stuff. This is the first time they’ve had an add on pack on;y pledge and I think it’s a great idea. This was a popular request in previous DF Kickstarters so it’s nice to see them responding to customer feedback in a tangible way. There are various other pledge levels that will get you sections of a castle like a gatehouse and ramparts or a complete tower all the way up to a large keep pledge that includes enough pieces to construct a good sized square castle with 2 square corners, 2 round towers and a gatehouse. The combination of these options gives backers a great deal of choice and flexibility, but, that comes at a cost and a lot of complexity.

The Dwarven Forge Castle Builder System, What I Don’t Like

I’m going to go right for the elephant in the room for this Kickstarter. It’s a very expensive project and there’s no other way to put that. Dwarven Forge tends to be expensive anyway but one of the benefits of the original Dwarven Forge Dungeon Tiles Kickstarter was that it had tremendous value for the money spent, particularly compared to what you needed to spend on their hand painted resin sets. This value for dollars spent has steadily gone down through each Kickstarter as they’ve increased in complexity. The Castle Builder system is also the fourth Dwarven Forge Kickstarter in four years and to be honest, last years was pretty spendy.

Don’t get me wrong, I’m not begrudging Dwarven Forge for their pricing, they’re a business and I want them to be around for a long time so I understand that they have to charge what they have to charge to stay viable. My complaint is twofold (and to be fair I’m not really sure these are complaints, they’re really just my observations).

First, this is a huge project with a lot of complexity. I think they would have been better served by either breaking this into two smaller Kickstarters over a two year period OR waiting another year and showing off a lot of this stuff in action in order to build anticipation and demand and to give backers wallets a chance to recover from the last three years and last years City Builder Kickstarter in particular.

On the subject of complexity, there is already an incredible array of pieces and options and they’re still holding stuff for the final run up to the end of the Kickstarter. I’ve been following the project pretty closely and watching their videos and livestreams and I still feel a little overwhelmed when I go look at all the pledges and options and then try to figure out what add-ons best go with what pledges. I imagine that someone coming to check out the project who hasn’t been following it as closely is probably at a loss to figure everything out and make a decision. It’s probably pretty confusing and some people are just going to pass on the entire thing because of that confusion. I think Dwarven Forge could have alleviated most of this by creating more video shorts explaining how the various pieces could work together rather than relying on spur of the moment livestreams.

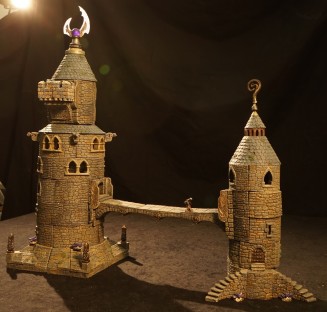
The Dwarven Forge Castle Builder System Sorcerer's Sanctum Pledge

The Dwarven Forge Castle Builder System Sorcerer’s Sanctum Pledge

My other observation is the spend for this Kickstarter. In previous projects you could spend a few hundred dollars – I’m talking three or four hundred dollars here – and receive a reasonable amount of stuff that gave you lots of options and flexibility to create an interior layout for a dungeon or cavern. Last years City Builder was noticeably less wallet friendly but still seemed reasonable for the utility, particularly for gamers who might have multiple games they could use buildings and city structures with. As a gamer who plays RPG’s and tabletop wargames I thought the City Builder set was a great addition to my terrain collection.

The Dwarven Forge Castle Builder system is another beast entirely. They offer some nice basic packages and late in the campaign have offered up some “complete castle” pledges at varying price points that give you the exact stuff you need to build a specific layout, like a Sorcerer’s Sanctum ($585) pr the Royal Stronghold ($1950). (Those prices are for the prepainted versions, the unpainted versions are $460 and $1500 respectively and it’s worth mentioning that these special sets don’t include any stretch goals). These and the other “complete” offerings are all great options for folks looking to just show up and buy something ready to build without poring over the various pledges and add-ons and trying to figure how everything goes together.

The problem is that if you watch the promo videos and short video builds of various setups that Dwarven Forge has produced it quickly becomes apparent that even if you pop for the $2000 Royal Stronghold pledge you still won’t have near enough stuff to build those epic layouts shown in the promo videos. I’ve spent quite a bit over the first three Dwarven Forge Kickstarters, around $3500 between the three projects ($800 on Dungeon Tiles, $1200 on Caverns and $1600 on City Builder), and that figure is low because it doesn’t factor in items I’ve bought from their website or via the secondary market to add to my collection. The issue here is that in order to get enough of the Castle Builder stuff to even approach some of the layouts that Dwarven Forge have shown in their build videos I’ll have to spend more on this one Kickstarter than all previous Dwarven Forge Kickstarters combined. RPG’s and dungeoneering aren’t my only hobbies so it’s hard to justify blowing a huge chunk of my annual gaming budget on this one thing.

This isn’t just me complaining about this situation either, it’s reflected in the number of backers that have participated in each of the Dwarven Forge Kickstarters. There were 5398 backers for Dungeon Tiles, 3950 for Caverns, 2719 for City Builder and with just over three days to go for Castle Builder there are a paltry (by comparison) 1315 backers. That is a 50 percent drop in participants just from last year, and I believe it’s mostly due to a combination of backer fatigue (4 increasingly expensive Kickstarters, 4 years in a row) and the issues mentioned above. (I also think that as these Dwarven Forge projects get more and more specialized there are a number of drop outs due to the sets not being as generically useful e.g., the number of people who need a city or castle set for their RPG adventures is fewer compared to the basic dungeon building set).

So Now What? How About Something Completely Different?

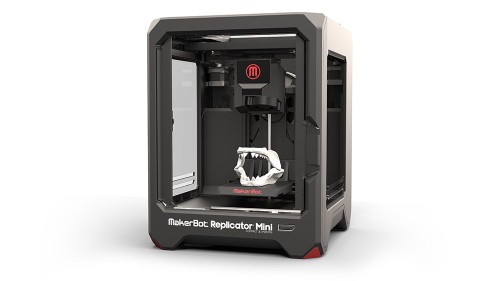
The Makerbot Replicator Mini 3D Printer

The Makerbot Replicator Mini 3D Printer

At the end of the day, the Dwarven Forge Castle Builder system is still a functional work of art that’s imminently useful for RPG’ers and tabletop gamers. Issues aside, it’s a fantastic set that once again delivers in terms of artistry and flexibility. While I am currently pledged at the add-on only level and I may end up getting one of the smallest Castle Builder set ups, I won’t be dropping anything near what I’ve spent on previous Dwarven Forge Kickstarters. In fact, I’ve decided to try something completely different and recently purchased a Makerbot Replicator Mini 3D Printer. I’ll have more to say about this in the coming days but if you’re interested in seeing my 3d printed works in progress as I learn how to use the Makerbot Replicator Mini you can follow me over on my Twitter account @HolyCrapItsLate.

Airbrush Cleaning Kit Review by Master Airbrush

 Hobby Tradecraft, News and Info, Reviews  Comments Off on Airbrush Cleaning Kit Review by Master Airbrush
Feb 032016


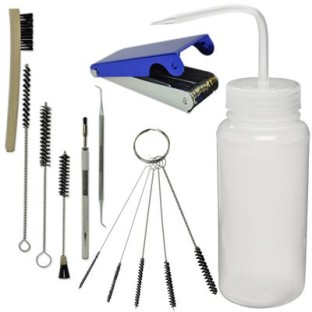
The airbrush cleaning kit by Master Airbrush

The airbrush cleaning kit by Master Airbrush

I recently posted an article about saving money on airbrush cleaners by using regular household or automotive cleaning products. That was intended for use between color changes and post paint session cleanups. Today we’re going a little deeper with an airbrush cleaning kit that you’ll find helpful when you really need to strip down your airbrush to it’s component parts and give it a thorough scrubbing.

The Master Airbrush Brand Airbrush Cleaning Kit

The Master Airbrush brand airbrush cleaning kit gives you lots of useful tools for breaking down your airbrush when you need to perform a thorough cleaning due to a clog or other issue and for that occasional deep clean.

The airbrush cleaning kit includes a large brush for cleaning the airbrush body, it includes a variety of small micro brushes for cleaning the barrel, tip and cap. These brushes include firm and soft bristle versions. There’s also a set of micro needles for cleaning out the tiniest passages (be very gentle with these as you don’t want to damage any small delicate parts).

There’s also a double ended pick tool that is useful for removing the rubber seals or gaskets if necessary for cleaning or when replacing them.

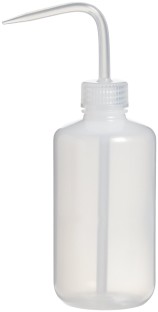
Lastly there’s a 16 ounce bottom feed wash bottle for your cleaning solution or rinse water. I actually recommend having two of these, one for airbrush cleaner and one for clean water. You can pick up one of these wash bottles on Amazon at this link.

These bottom feed plastic economy wash bottles make great airbrush wash bottles for airbrush cleaner and clean rinse water

These bottom feed plastic economy wash bottles make great airbrush wash bottles for airbrush cleaner and clean rinse water

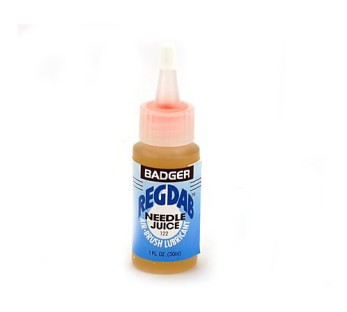
One thing that this kit (or any other commercially available kit that I’ve looked at) doesn’t have is some airbrush lubricant. Fortunately this can also be found on Amazon and there are a couple different choices. You can go with the Iwata Medea Super Lube or the Badger REGDAB (that’s actually
Badger spelled backwards for some reason) airbrush lube. Either one is a fine choice as they both do the same thing. The REGDAB airbrush lube is a one ounce bottle and costs around $7 to $8. The Iwata Medea Super Lube is .33 ounce and costs about $12. If you can’t find either of those products some “3 in 1 Machine Oil” will also work fine and is the least expensive at around five dollars for a 3 ounce can, which you can probably find at your local hardware store You’re going to be using this very sparingly so any of these products should last you for years of airbrushing. In a future post I’ll go over the uses for airbrush lube.

Badger REGDAB airbrush lubricant/needle juice for keeping your airbrush operating smoothly

Badger REGDAB airbrush lubricant/needle juice for keeping your airbrush operating smoothly

The Master Airbrush, airbrush cleaning kit is nice because other than a lubricant it has everything you need to clean and maintain your airbrush in one complete package. It’s also very reasonably priced on Amazon at $20 including free two day shipping for Prime members.

Get your own Master Airbrush brand airbrush cleaning kit here!


Jan 142016
 

Airbrushes are becoming a very popular “must have” among the miniature painter crowd and for anyone new to the practice of airbrushing models there are usually a lot of questions to go along with that. For lots of folks, they get all tooled up and ready to airbrush and it occurs to them that they’re going to need to clean their airbrush during paint sessions in between color changes and then thoroughly clean it after their painting session is over. This brings us to the topic of airbrush cleaner.

airbrush cleaner

What kind of airbrush cleaner can you use? You may be surprised by the answer.

Keeping your airbrush clean is fundamental to having a hassle free and fun airbrushing experience so it’s a good idea to develop a good cleaning regimen. It’s also important to have the right tools and cleaning agents to keep that airbrush working well. Today we’re going to talk about saving money on airbrush cleaner.

What Kind of Cleaner Can You Use To Clean Your Airbrush?

There are a lot of different products that are suitable for cleaning an airbrush. These range from name brand products made by the same companies that make airbrushes and airbrush paint, to run of the mill household items that you probably already have under the sink or in the garage.

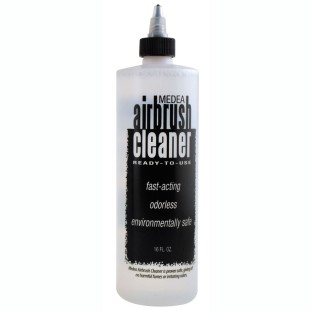
The name brand products like Medea Airbrush Cleaner and Vallejo Airbrush Cleaner tend to be the default cleaners that everyone assumes are necessary. These products are actually very expensive considering that you’ll be using some cleaner between color changes and quite a bit during post paint session cleanup. The truth is that you can use some very inexpensive cleaners to do the same thing. Some folks don’t run cleaner through the airbrush between colors. When I ask why they do it this way the answer is almost always “to save money”. This is why I use less expensive cleaners.

iwata medea airbrush cleaner

This Iwata Medea Airbrush Cleaner works well but like many name brand products, it’s absurdly expensive.

First lets talk about cost. A bottle of Medea Airbrush Cleaner from an art supply store like Dick Blick or similar will run you between five and six dollars for a 16 ounce package. I looked at Blick today and their price for the 16 ounce squeeze bottle is $5.29. That works out to 33 cents per ounce (approx). This means that a gallon of this product will eventually cost you a whopping forty two dollars. By comparison Vallejo Airbrush Cleaner comes in a 200ml bottle – about 6 ¾ ounces – and costs around $8 a bottle. The Vallejo product is more than one dollar per ounce. Multiply that by the number of ounces in a gallon, 128, and you get the idea. (I would usually use Amazon pricing for this comparison but to be quite honest the prices for these products on Amazon are insane. Here’s a link to the Medea Airbrush Cleaner so you can see what I’m talking about).

Secondly, what you’re actually buying is, for the most part, a mix of water, concentrated detergent and alcohol. A lot of other cheaper cleaners are made up of the same or very similar stuff. There’s really no reason to use such spendy cleaners in your airbrush when a readily available and much cheaper substitute can be used.

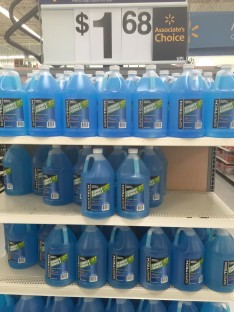
Fortunately, there is a great alternative. Quite simply, you can use a generic brand of automobile windshield washer fluid as an airbrush cleaning fluid and it will cost you pennies compared to the name brand cleaners. Take a look at this image taken at my local Walmart the other day.

cheap airbrush cleaner

This automotive windshield washer fluid makes an outstanding airbrush cleaner and as you can see it’s dirt cheap

I’ve been using this product or a similar one for about 5 years. Besides water, the active ingredient is methanol. There’s also a little bit of detergent. As you can see from the image above the price for a gallon of Supertech Windshield washer fluid is under $2 a gallon, even after adding in sales tax. I squirt a bit of this into the airbrush paint cup between color chang4es and run it through, then a bit of distilled water (you don’t have to use distilled water, but where I live the water is very hard and stains/scales up everything so I use distilled).

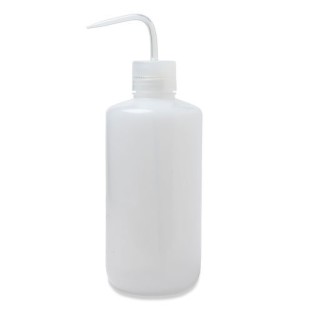
airbrush cleaner wash bottle

This wash bottle is perfect for dispensing your airbrush cleaner. Pick up two if you also need a rinse bottle for water

Since manhandling a gallon size bottle is tricky, I manage this by transferring the cleaner and water to a couple of these LDPE wash bottles with the hook nozzles. The bottles cost a few bucks each but you could use just about any container that will give you good control when dispensing the cleaner – an old counter top detergent bottle or a used water bottle with a sport top/pop top.

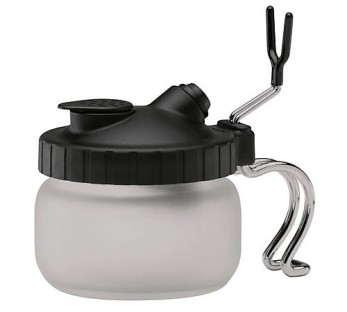
iwata medea airbrush cleaning station

The Iwata Medea airbrush cleaning station is a great for  controlling and containing your waste from airbrush cleaner

When doing clean outs and color changes I spray leftover paint, cleaner and water into one of these Iwata Medea airbrush cleaning stations. I find that the jar is large enough to hold all of my waste from a typical painting session so I just empty and rinse it in the sink afterwards. I also like that the jar has a built in airbrush holder on the handle. Using the jar keeps the vapor and odor in my work area to a minimum and completely prevents any spills.

An Important Distinction About Generic Airbrush Cleaner

I’ve seen people use lots of different stuff including Windex and Simple Green, for cleaning airbrushes.. My one caution is that if you use a generic or household cleaning product, make sure you’re using one that does not have ammonia as a component. Ammonia is a little bit reactive with some metals and alloys and can cause corrosion or tarnishing.

While you can certainly use other cleaning agents in your airbrush, I like good ‘ol windshield washer fluid the best because it’s cheap and you can find it almost anywhere. Walmart, the auto parts store, convenience stores, even the automotive section at the supermarket has it sometimes. Using windshield washer fluid as an airbrush cleaner will save you a TON of money over the long haul.


Get Your Zombie On With These Great Zombie Board Games Until The Walking Dead Comes Back

 Board Games, News and Info, Tabletop Gaming  Comments Off on Get Your Zombie On With These Great Zombie Board Games Until The Walking Dead Comes Back
Dec 042015
 

It is the long winter of our discontent – or at least our impatience – while we wait for the TV show The Walking Dead to return from its winter break. What’s a fan of the not quite dead to do? Allow me to suggest Zombie board games! We’re at a point in tabletop gaming that might be described as a golden age and for fans of the zombie genre that means you have lots of choices from very light and quick to play dice games to board games that feel like they’re right out of the pages of your favorite zombie comics, books or TV shows. I’ve put together a short list of some of my favorite zombified board games for you to check out and I hope you’ll find something here that you’ll be able to use to make the time in between episodes of The Walking Dead go a little faster and have fun while you’re waiting.

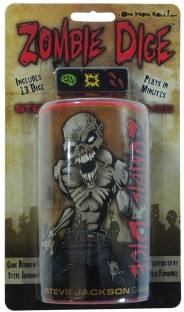
Zombie Dice

Zombie Dice - You're a zombie, eat brains, press your luck, don't get blasted! board games

Zombie Dice – You’re a zombie, eat brains, press your luck, don’t get blasted!

The simplest of Zombie games, Zombie Dice is most definitely a beer and pretzels game that even comes in a tube about the size of a beer can. There isn’t a lot of strategy here, you’re just rolling dice, looking to chow down on as many brains as you can before getting blasted. It’s a press your luck dice roller that is great as a warm up game or time filler between other larger games. Sometimes I break this out for people to keep busy while I’m setting up another game. Due to the fact that it’s so small you can throw it in your bag or back pack and break it out almost anywhere to help pass some time. It’s also really inexpensive at around $8 on Amazon. 2-5 players, about 15-20 minutes for your average play time.

Get your copy of Zombie Dice here!

Dead of Winter

Dead of Winter - survive the zombies, the weather and treachery from other bands of survivors

Dead of Winter – survive the zombies, the weather and treachery from other bands of survivors

Dead of Winter is a semi-cooperative game where players who are survivors of a zombie apocalypse will fight off zombies while dealing with other problems like trying to avoid getting bitten, the weather, and other players putting in the double cross. Each player gets their own group of survivors and there are loads of different and fun to play characters. It’s semi-cooperative due to the fact that while everyone is working on a common goal, each player also has their own secret objective which can have several different consequences for the other players. This means you have games where everyone, someone, or no one can win which keeps the game interesting and very dynamic. Dead of Winter is for 2-5 players and typically takes about 90 minutes to play. $44 on Amazon

Get your copy of Dead of Winter here!

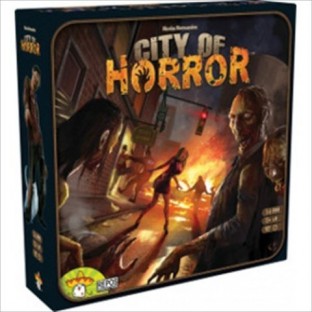
City of Horror

In City of Horror you'll need your persuasion and negotiation skills to outlast the other survivors board game zombies

In City of Horror you’ll need your persuasion and negotiation skills to outlast the other survivors

City of Horror is unique for a Zombie game because it isn’t really about fighting the zombies. It’s a game that’s about negotiation, diplomacy and ultimately, betrayal. In a city overrun by the walking dead players try to survive in a variety of buildings until they can be rescued. Each player controls a small band of survivors and must strive to keep everyone alive through the zombie filled night. The catch is that there’s only so much space in the building which means some survivors will have to be thrown to the ravenous horde of zombies outside. The mechanism for this is voting by the remaining survivors which means there will be lots of pleading, haggling and double crosses as players try desperately to get their survivors rescued. Definitely a different sort of Zombie game. 3-6 players. 90 minute play time. $25 on Amazon.

Get your copy of City of Horror here!

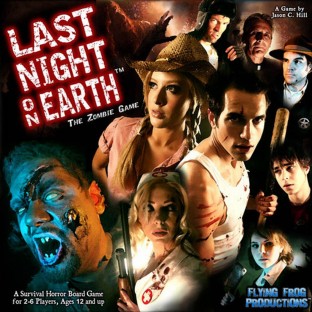
Last Night on Earth

It's the Last Night on Earth, can your survivors outlast the zombies? board games

It’s the Last Night on Earth, can your survivors outlast the zombies?

Last Night on Earth is probably the granddaddy of zombie board games. This game has awesome production values that include photos of the characters in full costumes and make up and with props. It even comes with an audio soundtrack. It’s one I’ve had in my collection for awhile that still comes out semi-regularly. Last Night on Earth is another semi-cooperative zombie game but in this game some of the players control the survivors while others control the zombies. That makes it different from most other zombie board games where the zombies are typically mindless and follow pre-programmed behaviors. Naturally, since they’re controlled by players the zombies are a lot smarter and more of a challenge than what you’re used to seeing. Last Night on Earth has been around for awhile so there’s lots of expansions available for it as well. 2-6 players. 90 minute play time. About $40 on Amazon

Get your copy of Last Night on Earth Here!

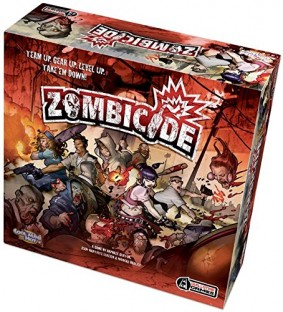
Zombicide

Zombicide is you go to post apocalyptic zombie survival board game

Zombicide is you go to post apocalyptic zombie survival board game

Zombicide was one of the early board game successes on Kickstarter that probably lead to the explosion of crowd funded board games we’re currently enjoying. This is a very thematic, action packed fully cooperative post apocalyptic zombie survival game. There’s no diplomacy or negotiation or hidden agendas, it’s just all out carnage as players battle zombies and try to survive. Players must work together to accomplish the mission objectives or they all lose. Each player takes on the role of a survivor and survivors are all based on familiar tropes or well known pop culture icons. As the players battle the zombies, they gain new skills and become better at defeating them while Zombicide’s clever spawning mechanic means that the zombies also get tougher and appear in ever increasing hordes. There are mechanics that take in to account how much noise players make in determinng how the zombies behave, as well as lots of loot for players to find and use in their quest to defeat the zombies. If you’re looking for a zombie board game that really simulates what it’s like to battle zombies in the land of The Walking Dead, this is the one. This game is intense and to be honest it’s pretty challenging for the players to win. The game is mission based so there’s tons of replay-ability with just the main game. Additionally there is loads of flavorful add on content that includes different types of zombies, new survivors. new locations like Prison Outbreak, Toxic City Mall and Rue Morgue.

Lots of extra missions, rule books and other free stuff can also be downloaded directly from the Guillotine Games Zombicide website. This is hands down the favorite zombie game of the various play groups and Meetups I participate in. Most people I’ve introduced Zombicide to are hooked about ½ way through their first play through. 1-6 players. Playtime varies based on mission but it can be anything from 30 minutes to 3 hours. About $60 on Amazon.

Get your copy of Zombicide here!

Check out all of the Zombide expansions and add-ons here

Visit the Guillotine Games website for free Zombicide downloadable content

Braaaaaainsssss!

There you have it, some of my favorite zombie flavored board games. While it’s not an exhaustive list of zombie board games, any or all of these should fulfill your zombie yearnings while you wait for the return of The Walking Dead. I have all of these games and they’re all great fun but if you’re only going to get one big zombie board game then I’d definitely recommend you pick up a copy of Zombicide. You can thank me later when you’re gritting your teeth and trying to desperately survive your own tabletop zombie apocalypse.